< Still under construction, adding hints as i play >
I Expect you to Die 2!
How to : Survive levels, identify Souveniers, and Collect ΩTrophies(Oculus 2)
Ω Biggest Fan : Find all 6 hidden movie awards
Ω Flight of the Phoenix : Complete all levels under the speed Run Time, Find all Movie Awards, Discover all souvenirs
Operation Stage Fright
Ω The world is a stage : Survive Level One
- Put on the headphones lying on the table. (audio cues)
- Grab the miniature shield and crossbow from over on your left & Bring them close for easy access later.
- Over your left shoulder is a small box mounted on the wall. Grab the trophy on top, then put in the code: 2112. Grab the butane gas canister and place within easy reach for later.
- Find the key in top drawer, and use it on the third lever on your right.
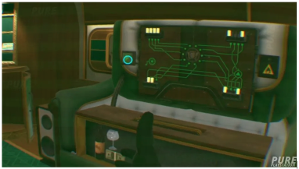
- Pull the first two levers to the down position and then pull the first rope up, and second down to line up the lights and the banners. Once each is in position, move the lever back to the up position to lock them into place.
- Pull the big handle on your desk, and push the R dial all the way up and push the other two all the way down to lift & turn the clock red
- When The light bulb on your desk indicates it’s showtime, pull 3rd rope to raise curtains & set the lever to lock them into position.
- Push the light switch on the big instrument to the left position (West), and then John Juniper will enter the stage and start talking.
- Follow the cues to let the show continue as planned, or ruin it right away by pushing the wrong audio cue on the big instrument on your desk. Do the latter if you want it done quickly.
- As soon as the mask descends, open the blue hatch on the left side of the gas system and replace with butane canister saved.
- The mask will now breathe fire and enemy agents will appear.
- On the right side you’ll get shot at by enemy on balcony. Use the mini-shield to block, then use the darts and your mini-crossbow to take out the agent, or use the EAST spotlight to blind him.
- Enemy will appear from the door below. Either use a dart that you’ve saved, or wait until the enemy agent throws their bomb. Return to sender to take out this baddie.
- This part is a little more tricky as an enemy will appear up above to throw a grenade while an enemy will appear from your left to shoot you with darts. Block the incoming shots while you take care of the baddie up above, and then take out the guy on your left to complete the level, or hit the one above with the L40 light before taking out one to your left.
Ω One Act Play : Complete in Speed run time
Ω Drama Lover - Collect all souvenirs in Level One
- Hidden Trophy Pick up Theatre trophy on top of the cabinet
- Master of Disguise Put on the hat, mustache, watch, and glasses. The hat can be found on the cupboard to your left by the crossbow, The other items are in the bottom drawer.
- Curtain Call Follow the stage directions to the letter. The stage directions can be found in the topmost drawer in the desk. You simply need to set the stage perfectly and then press the two stage-effect buttons at the right cue — listen out for John Juniper's speech and read along with the directions.
- Patience is a Virtue To get this Souvenir, don't start tampering with the mask until it starts to spew its poison gas everywhere. Very quickly take the canister out and replace it with the butane canister.
- Lights Camera Assassins To get this, use the lights to take out every Zoraxis agent that you can. You can use the box light to take out the Zoraxis in the box, and the light marked L40 to get the one opposite you on the catwalk.
- Return Fire This one can be a bit tricky. To get it, you must use poison darts to take out all four Zoraxis agents. To collect poison darts, use a clipboard or the small shield to block enemy darts. You can collect up to four at a time before they start disappearing, so get four and start firing them at the agents. If you run out of darts and you have no more gunner agents left to deal with, you'll have to restart the level — so aim carefully.
Operation Jet Set
Ω First Class Agent : Survive Level Two
- Pull the recline lever on the seat opposite you to reveal the battery on the cabinet behind it. Grab and bring it to your table.
- Push the little white button to bring the food cart your way.
- Get clue from postcard behind the John Juniper picture on the right side of the room.
- Grab the shiny metal trays and have them ready to reach.
- Punch in any four-digit code to activate the security procedures – lasers!
- Hold up the metal trays to deflect the lasers back at their origin to destroy them.
- One behind the John Juniper picture,
- Two is above the second window on the right hand side of the craft,
- Three is on the reclining seat. if you did step one, you won’t have to worry about this one, but it’s best to put it out anyway.
- Once the lasers have been destroyed, enter code 1313 into to the food cart to reveal a mask. Put it on. Grab the node under the mask.
- Cupboard under John Juniper has another battery, bring to desk.
- Look over your right shoulder and you’ll find the 4th and final battery in the bookcase. keep it with the others
- Once you have all of the batteries, look over to your right side again and you’ll see five books – Using telekinetic, pull the red book to reveal the secret stuff hidden in the sofa.
- The sofa will flip up. Pull the handle on the base to reveal Juniper’s stash
- Grab and put on the mask, and grab the gadgety thing and keep it.
- Refer to image to put batteries in place.
- Once you’ve completed the puzzle, the sofa will flip open a new screen. Hit the "Radio Signal Jammer" to re-establish communications.
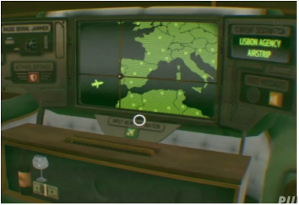
- Once told, 'Redirect the plane to another location' – send the plane to Lisbon Agency Airstrip.(guidance lined up in picture)
- A missile will now be launched – ignore the ‘Activate Defenses’ button, instead listen to the instructions of your handler.
- Look to your left and you’ll see a panel has opened on the wall press the upwards triangles, so the first and third buttons.
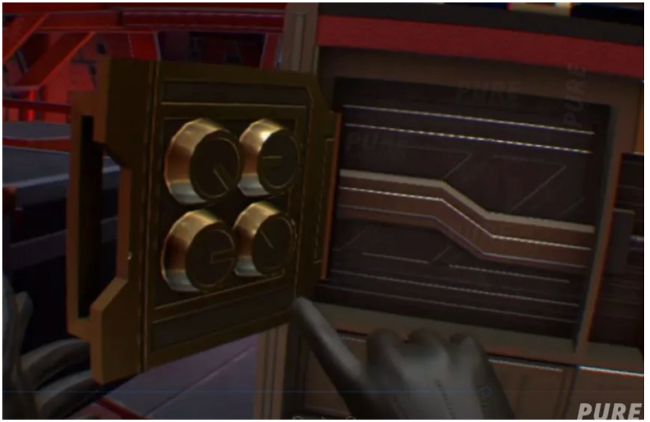
- Look down at your table : First, turn the left dial and you’ll open another control panel.
- pull out both cartridges, then place one of the cartridges in the top left slot
- Push the scale up to #6.
- Place the remaining cartridge in the slot directly under the the one you’ve already placed.
- Turn the second dial on table to open up another secret compartment. Once this is open stick that gadget thingy from Juniper’s sofa stash into the slot.
- Twist the knobs till all the needles on the device to sit inside the green zones on the readout.
- Wait till prompted, then reverse the process till they are all black.
- Push the scale on the left control panel down to #2
- Go back to the panel on the left wall and turn the red hinge to open a new panel and flip the second and third switches.
- Look Out of the window on your left to see a sliding door has partially opened on the wing. Smash the window with the ice pick and use your telekinesis to pull open the sliding panel so that the anti-missile defense system can pop up and take out the incoming missiles.
Ω Afterburner : Complete in Speed run time
Ω High Class Collect all souvenirs in Level Two
- Hidden Trophy - located in the galley. When you summon the food cart to your seat, you can see it in the distance to the right.
- Bombs Away - launch a bomb out of a window. With the oxygen mask on, break the window next to you with the ice pick. Then, summon the food trolley once more and enter the code for the Citrus and Co.: 1324. Very quickly pick up the small orange grenade inside the bowl and throw it out the window.
- Laser go Boom - Blowing up one of the lasers before it has a chance to activate. Behind you, to your right, use small cigarette lighter to light the exploding cigar on the table. Hold it right up to the laser emitter in the chair opposite till it explodes.
- Laser Defense Grid - To get this Souvenir, you cannot break the laser in the chair opposite, just make it face the ceiling. When it is time to destroy the missile, bring the chair back up and use the metal plate to reflect the laser out the window at the missile and it'll blow up.
- Art Appreciation - With the lighter, set the jet's menu on fire and then push it towards the portrait of John Juniper. When it burns, you'll get this Souvenir. You will also get it if you burn the portrait while defending yourself from this level's lasers.
- No Mask No Problem - Simply solve the wiring puzzle without using the mask to get this Souvenir. The solution is as follows: slot the four-pin device into the top-left connector, the device with only two middle pins into the bottom-left slot, and both devices with only the outer pins into the two connectors on the right side of the board. If you don't put the mask on at any point you'll get this Souvenir.
Operation Eaves Drop
Ω Fabricating a Lie : Survive Level Three
- Wait a few seconds for torch to drop down from above, Pick it up to make it easier to see.
- To turn off security system, pick up the orange ball off the shelf and place it on the hand statue on the left side of the stuffed bear.
- Use the winch system to lower yourself down to the ground level.
- Open each of the 3 right hand drawers until you line up the red square.
- On the right hand side of the desk is a small blade. Pick it up.
- On the upper desk are two drawers. Open the bottom draw slowly, and only enough to slip a blade through to cut the cord on the booby trap.
- Open the drawer fully and you’ll find a chisel-like tool. Use the handle-end to unlock the little door with matching keyhole, then the chisel end to unscrew the back wall inside.
- Sit back up and look up above the desk. Bring the Wheel with a handle to the desk.
- Open the small sliding panel in front of you to reveal a gear mechanism, and use the wheel from the wall to turn it and open a new section.
- On the left of this new section is another door. Open it and take the tool hidden behind the file.
- Use new tool to open the drawer on the left of the desk – the one on the left side of the symbol piece in the middle. There will be a note and a dial. Remember where this dial is.
- Grab the blade tool you used earlier and direct your attention to the cupboard on the lower left hand side of the desk,
- Use the blade’s handle side to act as a key to open the door.
- Pull it open and Open the top drawer to get the wire cutting tool.
- Now, look down at the bottom of the drawer and you’ll see some files and a dial.
- Remember the other dials? Turn the dials until the middle section of the desk looks like image.
- The door will open and you’ll find a mask inside, open it up to reveal a collection of wires.
- The agency will drop down a tracking device from above – grab it and keep it safe.
- Remove the battery on the left side of the mask.
- Use the wire cutting tool to snip the red wires on the right side of the mask.
- Remove the square piece and then pop the tracking device underneath.
- Place the red square piece back into position.
- Look up at the wall behind the desk and you’ll spot a gun of sorts. Use to reconnect the red wires.
- Place the battery back into the left side of the mask. It will now close.
- You’ll be disturbed by the sound of a security guard on the floor above. You need to grab the mask and put it on. Then you need to look up at the top of the desk and you’ll see a grey box with a dial and some stickers. Turn the dial to the first dial “default: me”.
- You can then look up at the guard, gesture to him – whatever. He will think you’re The Fabricator. He will apologize and then leave.
- Take the mask off, put it back, and then winch yourself up out of there.
Ω Gone in 130 Seconds : Complete in Speed run time
Ω No Drawer un-opened : Collect all souvenirs in Level Three
- Hidden Trophy - This trophy is hidden to the left whilst winching yourself down. Make sure you have the flashlight in your mouth to see it. It is on top of a cardboard box.
- Audiophile - Find all six audio tapes and play them. Most can be found near the tape player, but there is one in the second drawer down to your right and another one in the recess to your right once the desk is unlocked.
- The Bear Did It - When the guard has found you, find an arrow in the drawer above the exploding drawer and place it in the bear statue's crossbow.
- A Vintage To Die For - When the guard has found you, use the bottle of poisonous gas to take him out.
- Hard Hat Area - There is a metal helmet close to the tape player, retrieve it and place it on top of the bear statue's head..
- Not That Kind Of Bug - When you are working on the Mimic Mask portion of the level, take the tracking device and place it on the plant that you can find to your right.
Operation Party Crasher
Ω A case of Wine : Survive Level Four
- Don’t wait! Grab two glasses from your right hand side. The glasses you’ll need are the second set down from the top. Grab these and stick them in the lift.
- Look over to your left and you’ll see a bunch of wine bottles across the room. Grab the one with a tag hanging off the top of it. If you’ve grabbed the right one, it should say “LAST BOTTLE Be careful!” on the tag. Place this in the lift alongside the glasses. Do it quick enough and you’ll have everything in there before the lift automatically goes up. Handy time-saving technique. Juniper will then ask you to send up a new mimic mask. He will send the lift down and inside will be a key. Grab it.
- Along the wall you’ll see a ladder and five wine barrels. Take the key and place it into the keyhole on the fourth barrel (counting from left to right.)
- A giant axe will appear on the ceiling. Don’t worry… Yet.
- Look back at the barrels and then turn off barrels three and four. This will send the deadly axe back up into the ceiling and it’ll open the secret door behind barrels four and five.
- Grab the middle mask from the top shelf – the white one – and then place it in the lift and send the lift up to the ballroom.
- Next, grab the red mask from the the shelf directly underneath where you grabbed the mimic mask. Put it on. It looks good on you.
- With the mask on, you’ll be able to see hand and footprints. Press the handprint on the secret door area and a red button will be exposed. Press the red button to bring up the panel on your table, but don’t press anything just yet. It’s time to do some prep work.
- Look over to the left hand side of the room and you’ll see a huge barrel with a couple of swords stuck into the middle section. Remove these swords.
- Above the barrel is a selection of swords and you need to grab the second and sixth swords and place them into the metal thing on the front of the barrel.
- This will cause a handle to pop out of the left hand side of the barrel. You can grab this now and open the secret door. This is prep for later.
- Now, back to your little table. On the left you’ll have a switch and the word “MAP”. Flip this switch to bring up the map, then turn the dials labelled “Alarms” and “Sprinklers” and then punch the buttons labelled “Front” and “Rear”.
- Now, back at the “MAP” section of your control panel, turn the dial to change the map to see the second floor.
- You should see Juniper and the Guards on the map. As each guard enters a room with a Knight symbol, turn the dial on the right hand side to correspond with the room they are in. Then push the lever to release gas and knock the guard out. Do this for each of the guards that ventures into a room.
- You’ll notice one guard is on the balcony and won’t move. Send the lift up to the billiards room and then press the bell. This will bring in the guard and you’ll be able to gas him. But don’t stop – keep pushing that gas lever until the meter shows it as empty. This is vital. You need to use up all of the gas on the last guard. Do it on the others and you’ll be exposed.
- Juniper will send the briefcase down in the lift. Grab it!
- Guards will show up at the door and you’ll be rumbled, but it’s OK. A guard will try to shoot you – block the shot with the suitcase.
- Next, a grenade will be thrown into the room. Grab it using your telekinesis skills and move it into the big barrel on the left hand side of the room.
- Close the door, quickly!
- Boom. The grenade will explode and you will be home free to die another day.
Ω Premium Service : Complete in Speed run time
Ω The Butler Did it : Collect all souvenirs in Level Four
- Hidden Trophy - Send the dumbwaiter down instead of up. The trophy is resting on top of the box
- Smoke Alarm - When it is time to cause a panic on the upper floors, retrieve one of the smoke grenades from the wall opposite. Pull the ring, place the grenade in the dumbwaiter and send it to the ballroom. You may need to also turn on the alarm and the sprinklers.
- Face Off- To get this Souvenir, put on either the Mimic Mask or the red mask that reveals the handprints and footprints when John Juniper and his henchmen come to the wine cellar.
- Meat Cleaver - Mess up on the wine barrel puzzle and dodge the axe trap. Pick up a sausage from the plate to your left and slice it on the blade.
- Notes Of Leather - At the beginning of the level, send up a shoe instead of the wine that Juniper requests.
- Explosive Studies - When you are being bombarded with grenades at the end of the level, put one in the dumbwaiter and send it all the way up to the study.
Operation Safe and Sound
Ω It's a Wrap, It's a Trap! : Survive Level Five
- Use the knife in front of you to jimmy open the second draw on your right side.
- Open the drawer and you’ll find : notepad, lighter, electric drill, and an attachment for drill.
- Take the drill and and attachment and combine them.
- Take the lighter and use it on the agency logo in front of you.
- The room will be revealed as a set and the wall and ceiling will be pulled away while a laser trap keeps you in place.
- You’ll see Juniper up in the room ahead of you. You can sit and listen to his evil monologue, or you can wave an object in front of the glass and he’ll skip ahead to where he tries to kill you.
- On the left side of the glass where Juniper stands is a walkway with a rocket system. In front of you on the ground is a death-ray laser. You need to disable both.
- Take any object and wave it around and you’ll notice that the laser-guided motion-sensor missiles will follow your object. Take something, like the plate from your desk, and wiggle it around in front of the death-ray laser. If done right, the missile will smack into it and disable the death-ray laser.
- Get another object – quickly – and wiggle it above the rocket system to have it disable itself.
- The rocket system will fall down to the ground in front of you, and you’ll find a battery is on the debris, attach it to the electric drill you found earlier.
- Look on the floor in front of you and you’ll find the death-ray laser – grab this and keep it safe.
- Use your electric drill to open the small door above you, exposing the heat level of your laser prison. You need to get it to overheat. But how?
- Take the attachment off the drill and replace it with the death-ray laser. Now it gets tricky…
- Look over to the left in front of the trailer/caravan and you’ll see a little stand with two yellow arrows. Press the buttons until the red, gold, and black flag is shown behind the podium on the right hand side of the buttons.
- Now, look way over to the right and you’ll see a mirror that can be interacted with using your telekinesis abilities. Pull it up so it’s standing straight.
- Now, direct your death-ray laser beam at the mirror inside the trailer/caravan and it should ricochet to the other mirror and then to the reflective flag behind the podium, and finally to the box above your head. If all goes to plan, it will overheat the laser system and you’ll be free.
- Your boss will come back in over the radio and he’ll ask you to signal your location. Look up at the catwalk and use your death-ray laser on the box and the film camera to destroy them, revealing the water tower in the background.
- Use the death-ray laser on the water tower.
Ω Short Film : Complete in Speed run time
Ω Best Performance, Drama : Collect all souvenirs in Level Five
- Hidden Trophy - Next to the mirror in the trailer and can be hard to see — wave your pointer around there until it turns blue to retrieve it.
- Director's Cut - John Juniper has a long speech once his set is revealed. Pick up the clapper leaning against the director's chair. Bring it to your hands and then use the clapper to cut Juniper off — this is also crucial for speedruns.
- Grilled Cheese- Find a way to cook the sandwich. This can be done by setting fire to it with the lighter found in the drawer to your right, or by placing it underneath one of the lasers.
- Childproofing- Pick up the fork from the beginning of the level and stick it into the conspicuously large electrical outlet on your left.
- Minty Fresh - Retrieve the toothbrush at the beginning of the level. Once you have a fully powered drill, attach the toothbrush to the end of it and use the device to brush your teeth.
- Property Damage - When you have a handheld laser, use it to destroy every single item in the level. Avoid the explosive barrels however as they will kill you. Note that the water tower does not count but the small plates do.
Operation Rising Phoenix
- In the lobby, grab the blue ticket with “A7” On the right side toward the back of the pile.
- Place it into the ticket slot inside the elevator and press the number “32”.
- The elevator will get shot at and you’ll stop before reaching your destination. Grab the screw driver and the wire cutting tool from the red utility cart..
- Open up the door on the utility cart to reveal a couple of keys. Keep the small one handy and use the big one on the door above you inside the elevator.
- Next, grab the fire extinguisher from the left side of the room.
- Use the blue screwdriver to remove the four screws on the broken elevator panel.
- Once you’ve done this, grab the fire extinguisher and keep a hold of it.
- Pull off the panel and a bomb will fall down in front of you, breaking and setting fire to your elevator. Use the fire extinguisher to put out the fire.
- Now use the wire cutters to snip the black and red wires inside the elevator panel. Do NOT touch the sparking thing in the middle. You’ll need this later.
- Once you’ve cut the wires, the elevator will drop a little bit, revealing another room with a control panel and some screens showing the captive world leaders.
- Use the small key from earlier and use it to unlock & open the small metal box on the left hand side of the control panel. (an exclamation point inside a triangle on a yellow background.)
- Pull the level down to free the prisoners, and open the door just to the left of the lever.
- Grab the red box and bring it up into the elevator.
- Look back down to the bottom room and you’ll see a guard hat and a cattle prod on the right hand side of the screens. Grab the cattle prod and bring it into the elevator.
- With the red box placed in front of the elevator panel, grab the black wire and attach it to the tip of the cattle prod that has a black band on it THEN the red wire to the other prong.
- Use the cattle prod to charge the big red battery pack.
- Next, take the red cable from the battery pack and attach it to the red cable on the elevator panel, and the black cable from the battery pack onto the black cable on the elevator panel.
- The lift will restart and it’ll start to move upwards again.
- Oh no, there’s a mechanical saw cutting the elevator cables. What to do! Grab that sparking thingy from the elevator panel.
- Pull down the little door with a ‘Z’ on it, and then hold the sparking thingy up to the control panel. Wait a few second and it will explode, disabling the saws.
- You’ll travel up to the top where Juniper is doing his evil monologue. Before he notices you, open the box on the right hand side of the walkway and pull the lever down to cause Juniper’s platform top open and leave him hanging from the edge.
- Juniper’s suitcase will fly out of his reach. Grab it from the right side platform and bring it to your area.
- On the left, you’ll find another blue screwdriver, just in case the old one isn’t with you…
- Now, open the suitcase and prepare to solve some puzzles.
- The timer says that you have ten minutes. You don’t. That timer jumps down by a couple of minutes each time you solve a puzzle, so no dawdling around.
Ω Rise and Fall: Survive Level Six
- The one on the left hand side – “ENCRYPTION.” Use the blue screwdriver to remove the top panel.
- I’ll be honest with you… I stole this answer from someone who just smashed every button there may be an easier pattern....
- Look at the image and then punch the buttons in the following order: 6-4-5-3-2-5-2-1-4-3-5-2-5-1-4-2.
- The first puzzle on the top left that says “CONFIRMATION” on the bottom is the easy one. Pull open the door and you’ll find dials on the back. Turn them into the positions shown in the image.
- Next, the bottom right where it says “TARGETING” is perhaps the easiest to complete. All you need to do is move the little knob around and make sure it passes each right dot once to turn them all blue.

- You’ll then need to press the “Abort Launch” button on the top right of the briefcase.
- Oh no, low power! What to do! The unit will open up and reveal a place to attach the red and black power cables you are currently using to power the elevator. It’s you or the world, agent… Take those cables and make your momma proud.
Ω Express Ride : Complete in Speed run time
Ω Over the top : Collect all souvenirs in Level Six
- Hidden Trophy - you need to get the small key from underneath the fruit plate in the lobby at the beginning of the level. Once you are on level 32, use this key to unlock the padlock to your left — the trophy is inside.
- Bzztnana - Get the banana when you're in the lobby and save it for most of the entire level. At the point where you need to charge the battery, try to use the banana instead by connecting the crocodile clips to either end.
- The Final Mask- At the very end of the level, once Juniper is no longer wearing the Mimic Mask, pick it up and wear it.
- Prods To Plowshares- Similar to the banana Souvenir, use the cattle prod to charge the battery. While it is turned on, attach a crocodile clip to each of the prongs..
- Batteries Not Included - When the saw is whirring above the elevator, take the battery from its place and use that to break it. It will explode, so be quick.
- Don't Try This At Home - On level 32 you can retrieve a can of ZD-40 oil. You will also have access to a cigarette lighter on your left. Use these items to make a flamethrower by aiming the propellant oil at the lighter's flame.